Defining the object security, assignment policies, and notification policies of locations
Manage Locations task tab
Use the Manage Locations task tab to define the object security, assignment policies, and notification policies of locations.
Defining location object security, assignment policies, and notification policies
1. With the Manage Locations task tab selected, click the EDIT icon.
2. Find the location(s) whose object security, assignment policy, and/or notification policy you want to define by simple name search, alphabetical index, grouping, or saved or public search.
Note: Selecting “All Locations” is not recommended because of the large amount of data that could be returned.
3. To edit selected locations in the displayed list, highlight the location(s) and click Edit Selected.
To edit all the locations in the displayed list, click Edit All.
| If you choose to edit multiple locations, be aware that all and only the changes you make will be applied to all the locations you select for edit. When in doubt, edit locations one at a time. |
4. Set object security access permissions to the location(s):
• If you selected one location, click the Object Security “EDIT” link.
• If you selected multiple locations, check the Object Security box.
5. Set assignment policy access permissions to the location(s):
• If you selected one location, click the Assignment Policy “EDIT” link.
• If you selected multiple locations, check the Assignment Policy box.
6. To define an exception to the standard assignment policy:
• If you want to define an exception for just one security group, click “No” in the Has Exceptions? column for the security group.
• If you want to define an exception for multiple security groups, click Exceptions for Multiple Security Groups, and select the security groups.
• Click New Exception.
• Enter a name for the exception.
• Choose the assignment rights the group should have from the drop-down list.
• Enter the start date/time and end time of the exception and, if it spans midnight, click the link icon

and enter the end date.
• If the exception repeats, define the repeating pattern or ad hoc dates.
• Click Done.
Note: Repeating patterns are limited to 7 years, and long repeating patterns can slow the system. Simple exceptions using a single occurrence from Date A to Date B are more efficient and recommended.
Assignment policy exception example:
7. If you want to define a notification policy for the location(s), do the following:
• If you selected one location, click the Notification Policy “EDIT” link.
• If you selected multiple locations, check the Notification Policy box.
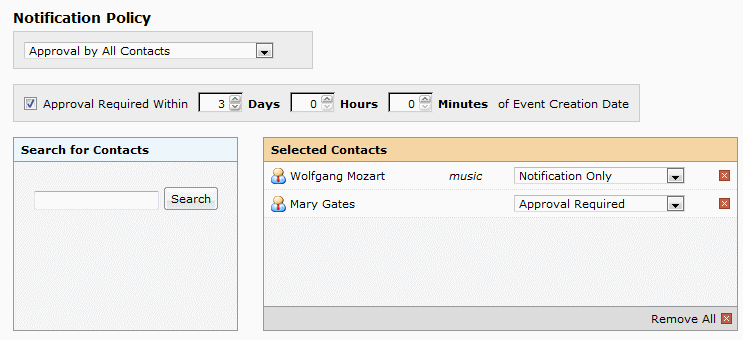
• Choose whether the notification must be approved by at least one of the users associated with the notification or all users associated with the notification.
• If you want to set a time limit within which the user(s) associated with the notification must act, check the Approval Required Within box, and set the number of days, hours, and/or minutes after the notification creation date that action must be taken.
• Perform a simple full or partial name search for a user you want to associate with the notification policy, then select the user(s) in the search results. (You can also click the Select All arrow to select all returned users.)
• If you need to run another search to find other users you want to associate with the notification policy, click the Back arrow and search again.
• For each associated user, choose the type of notification they should receive—Approval Required or Notification Only.
Note: If you need to remove one or more users you’ve associated with the notification policy, click the Remove button (red X) of each, or click Remove All to remove all associated users.
Location notification policy example:
8. Click Save Changes.
| You can use the notification policy of a location as a “template” to define the same notification policy for other locations. To do this: 1. Find the location with the notification policy you want to use as a template. 2. Select that location for edit along with the other locations you want to define a notification policy for. 3. Check the Notification Policy box, then choose the location whose notification policy you wish to use as a template from the Use Template drop-down list. 4. Click Save Changes to apply the notification policy “template” you chose to all selected locations. e events you select for edit. When in doubt, edit events one at a time. |
| Effects of functional security The Location Access functional security access you set for a security group must be at minimum “Can View” before the related object security is applied. For information on modifying the functional security rights of security groups, see “Managing security groups” |

