Report scheduling
| Required functional security Functional security required to schedule reports: Tasks, Reports, and Email: Report Access = Can add, delete and modify custom reports |
Schedule Reports task tab
Use the Schedule Reports task tab to:
• Add report schedules
• Copy a report schedule as the basis for creating a schedule for another report
• Edit report schedules
• Delete report schedules
Guidelines for adding a report schedule
• You can only schedule standard reports or custom reports that were created by copying and modifying a standard report using the Interactive Reports Report Engine.
• The Begin Report Schedule On field is set to tomorrow’s date by default, so you can’t set a report schedule to begin today.
• Report schedule repeat options are limited to daily and weekly. If you need to set up a report to run monthly, set the weekly repeat option to every fourth week.
• If the report you’re scheduling has a Report Date, Start Date, and/or End Date parameter field, use these fields to enter how many days of data from the scheduled date the report should include. For example, if the report you’re scheduling has Start Date and End Date parameter fields, and you want the report run weekly on Monday and to show data for the previous Monday - Friday, you’d enter -7 in the Start Date field and 5 in the End Date field.
Adding a report schedule
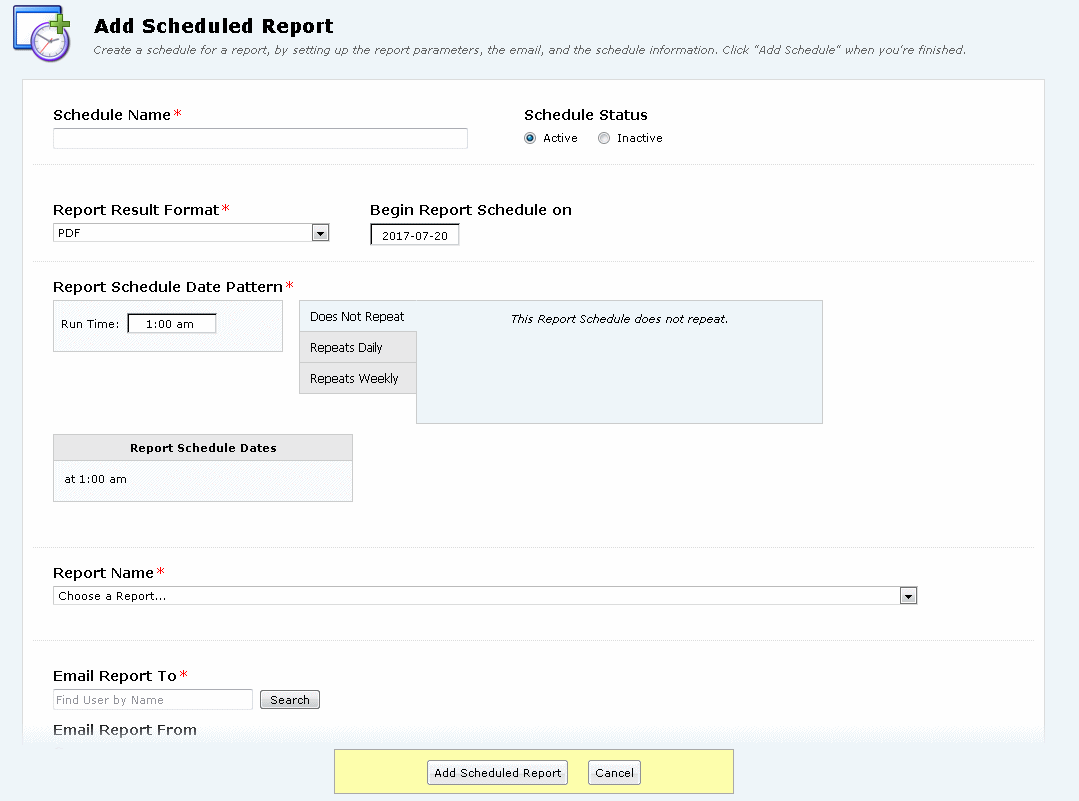
1. With the Manage Schedule Reports task tab selected, click the ADD icon to go to the Add Scheduled Report page.
Note: You must scroll down to see all the schedule information you can specify.
2. Enter a name for the schedule and indicate whether the schedule is active or inactive (the default is active).
3. Choose the format you want for the generated report from the Report Result Format drop-down list.
4. Enter the date you want the schedule to begin, or click and choose the date using the calendar control.
5. Click Run Time, and choose the time you want the report generated.
6. If you want the report to be generated on a daily or weekly schedule, click the appropriate tab (Repeats Daily or Repeats Weekly) and choose the daily interval or days of the week.The schedule pattern you’ve selected is shown in the Report Schedule Dates box.
7. Choose the report this schedule applies to from the Report Name drop-down list.
8. If the report has a Report Parameters section, enter and/or select parameter values. For example, if the report has a Start Date parameter, enter the number of days of data prior to the scheduled report run date that should be included in the report (see
“Guidelines for adding a report schedule”), or if the report has a Location Search parameter, choose the location search you want from the drop-down list.
9. In the Email Report To area, enter the full or partial name of the 25Live contact you want the generated report emailed to, click Search, then select their name from the drop-down list. If you need to redo the search, click the Redo Search button. To send the report to multiple contacts, enter their email addresses in the name field, separated by commas.
10. Repeat step 9 in the cc and bcc areas as needed to copy and blind copy other contact recipients.
11. Select whether you want the email to come from you or another 25Live contact (“someone else”). If you selected “someone else,” enter the full or partial name of that person, click Search, then select their name from the drop-down list. If you need to redo the search, click the Redo Search button.
12. Enter the Subject and Body of the email you want sent. The generated report will be attached to this email.
13. Click Add Scheduled Report.
Copying a report schedule
1. With the Schedule Reports task tab selected, click the COPY icon.
2. Find the report schedule you want to copy by selecting All Scheduled Reports or My Scheduled Reports (schedules you’ve created), highlighting the schedule, then clicking Copy.
3. Enter a new recipient name and/or email addresses for the schedule and change other information as needed.
4. Click Add Scheduled Report.
Editing a report schedule
1. With the Schedule Reports task tab selected, click the EDIT icon.
2. Find the report schedule you want to edit by selecting My Scheduled Reports, highlighting the schedule, then clicking Edit. You can only edit report schedules you’ve created.
3. Edit the schedule information as needed.
4. Click Save Changes. (right button name?)
Deactivating a report schedule
1. With the Schedule Reports task tab selected, click the EDIT icon.
2. Find the report schedule you want to deactivate by selecting My Scheduled Reports, highlighting the schedule, then clicking Deactivate. You can only deactivate report schedules you’ve created.
3. Click Deactivate to confirm.
Deleting a report schedule
1. With the Schedule Reports task tab selected, click the DELETE icon.
2. Find the report schedule you want to delete by selecting My Scheduled Reports, highlighting the schedule, then clicking Delete. You can only delete report schedules you’ve created.
3. Click Delete Report Schedule to confirm.


